Launching SafePal wallet
In this SafePal wallet tutorial, it is first important to know that this wallet exists in both hardware and software versions. The SafePal wallet is a platform for decentralized applications, the most important of which is Binance. The SafePal wallet has been in production since 2018 with the support and partnership of Binance, which has increased the popularity of SafePal among people due to the support of this famous exchange. Setting up the SafePal hardware wallet is not particularly complicated, but it may be a bit confusing for you to do so due to the excessive repetition of scanning QR codes. In this article, we will teach you how to use the SafePal hardware wallet.
A Brief History of SafePal Wallet
The SafePal hardware wallet was first introduced in 2018. Binance Exchange joined as an investor in the production of this wallet in November 2018. After that, in June 2019, SafePal company launched its first wallet called SafePal S1 for sale. In July 2019, SafePal first started supporting the Binance blockchain network. Continuing the path in August 2019, the possibility of storing Binance Coin and its network tokens was provided in the SafePal wallet. Over time and in the last month of 2019, with the cooperation of Simplex company, the possibility of buying cryptocurrencies for SafePal was provided. In June 2020, the SafePal software wallet was released, which supported DeFi platforms. In December 2020, the ability to support the Binance Smart Chain network was provided, and in October 2020, the ability to store tokens that supported the Binance Smart Chain was provided. Finally, in January 2020, SafePal launched its own token called SFP.
Features of SafePal hardware wallet
-
SafePal wallet supports over 11,000 cryptocurrencies and tokens, which is a record among hardware wallets.
-
The SafePal hardware wallet uses QR code technology and does not have the risks of USB and Bluetooth connectivity.
-
The SafePal wallet has a color display that is very user-friendly.
-
This wallet supports the Binance DEX.
-
With this wallet, you can directly interact with DeFi platforms.
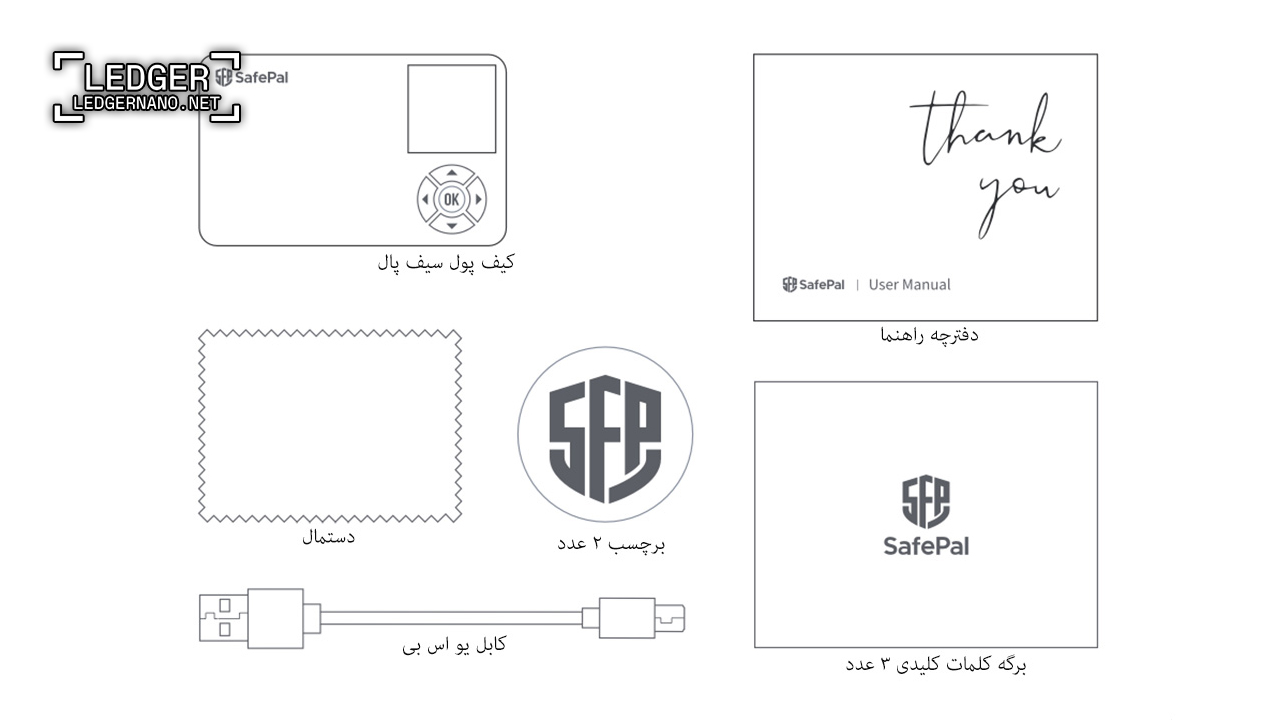
What’s Included in the SafePal S1 Hardware Wallet Package
When you receive your S1 hardware wallet package, the first thing you should do is check that the device is intact and has not been used by anyone. Here are some details you can pay attention to:
- Check if the package is opened or damaged.
- Check if the gift box of the wallet is intact with the anti-counterfeit stickers attached to it.
- Check if the screen of the S1 device shows the language selection page and guides you through the device authentication process.
- Check if any of the items in the gift box are missing.
The image below shows the items included in the S1 hardware wallet gift box:
SafePal Wallet Authentication
Step 1 Start Authentication
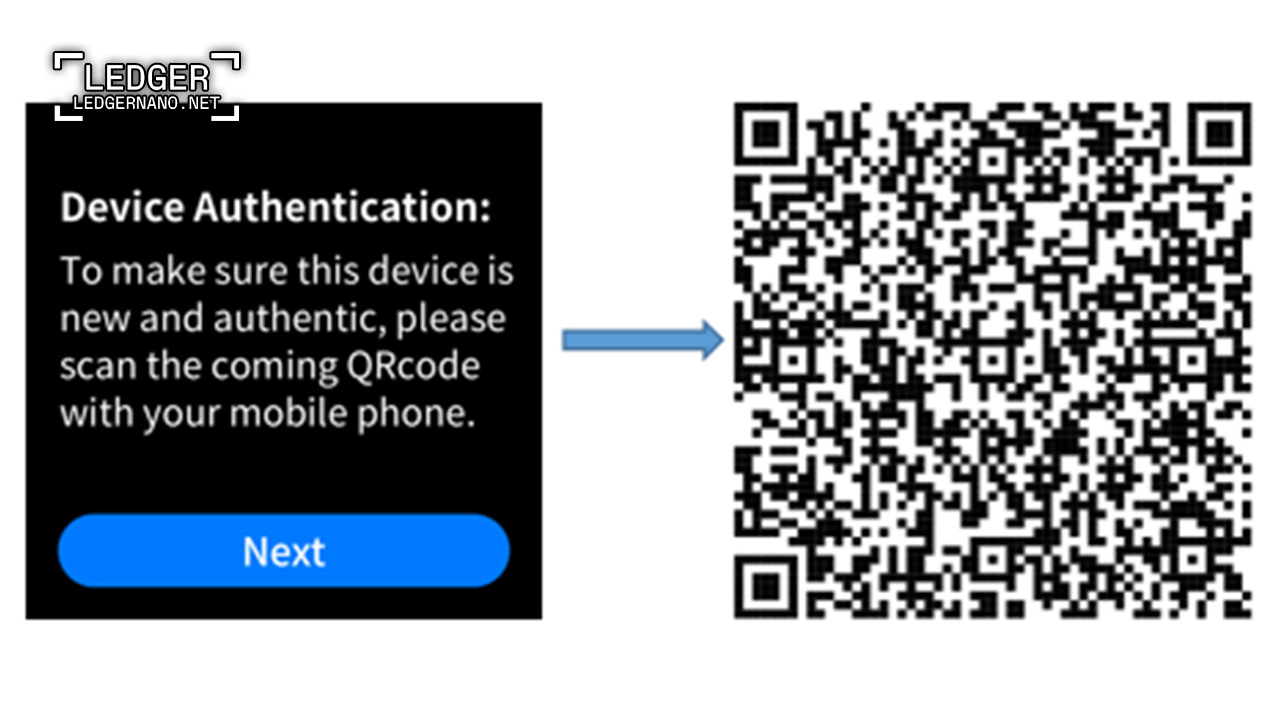
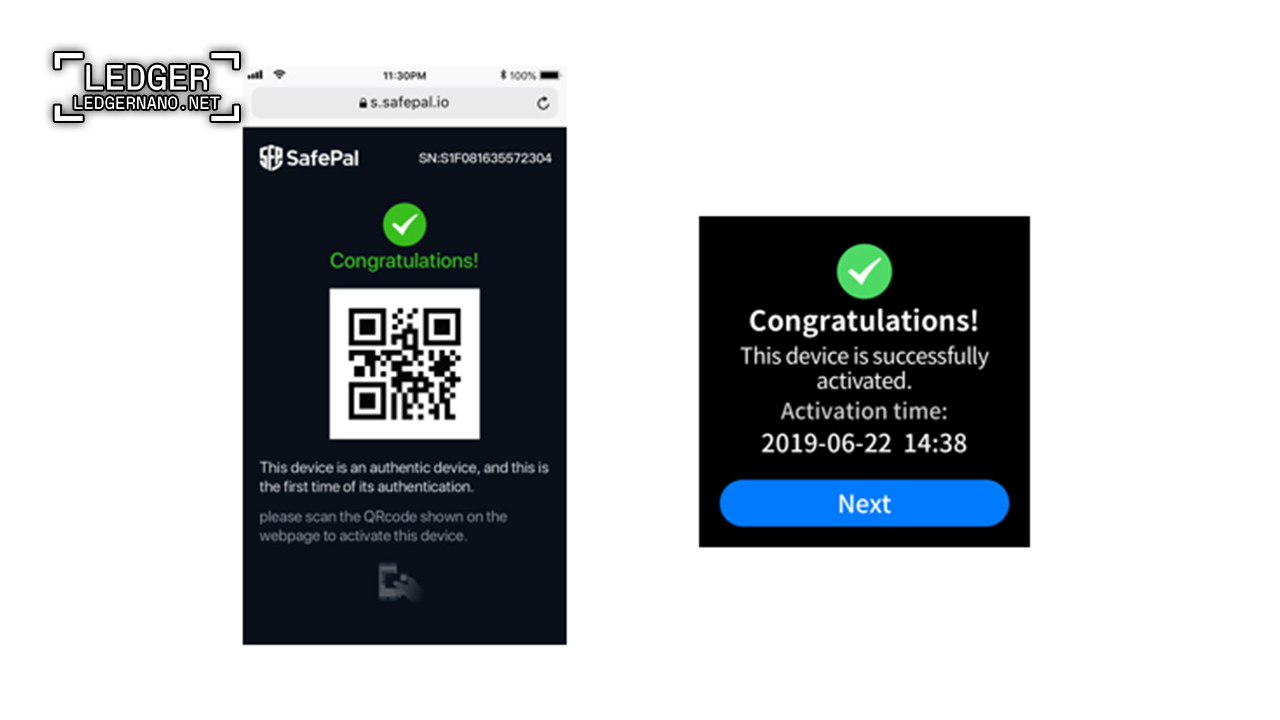
When you initialize the SafePal hardware wallet, the first step is to choose a language. After doing this, you will see the “Device Authentication” interface. By clicking “Next”, you will see a unique QR code on your S1 device.
Step 2 Receive and Enter the Verification Code
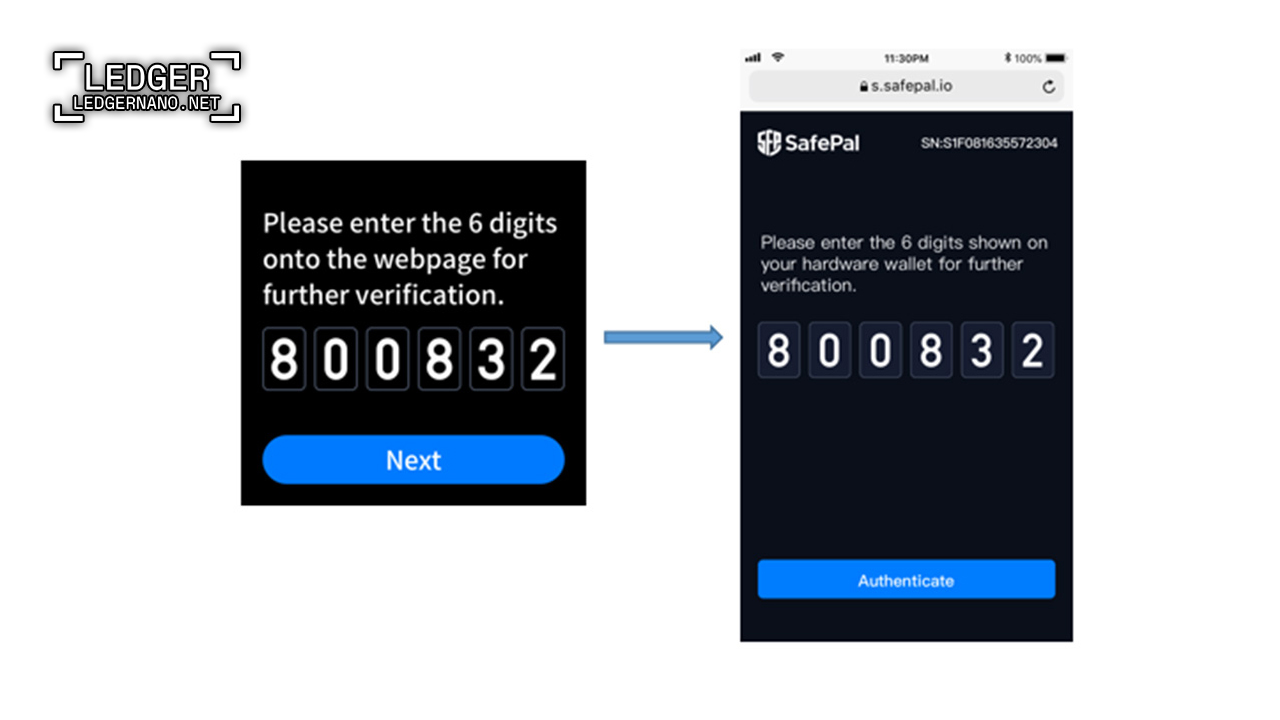
Use your mobile phone browser to scan the QR code displayed on the S1 device. The QR code will direct you to a verification page. On the S1 device, click the OK button to proceed to the next step, where you will see a 6-digit code randomly generated by the S1 device. Enter the 6-digit verification code on the verification page opened in your mobile phone browser.
Step 3 Get the Authentication Result
By entering the verification code in your mobile phone browser and clicking on “Authenticate”, you will see the authentication result. If the result shows that the device is a genuine device and has never been used, congratulations, your device is safe to use! If you see a different result, please contact us for further assistance.
Step 4 Activate the Device
On the S1 device, click on “Next” and scan the QR code displayed on the result page to activate the S1 hardware wallet. The activation process may take a few minutes. Please be patient. Once the activation is complete, you can proceed to initialize the S1 hardware wallet.
Initializing the SafePal Wallet
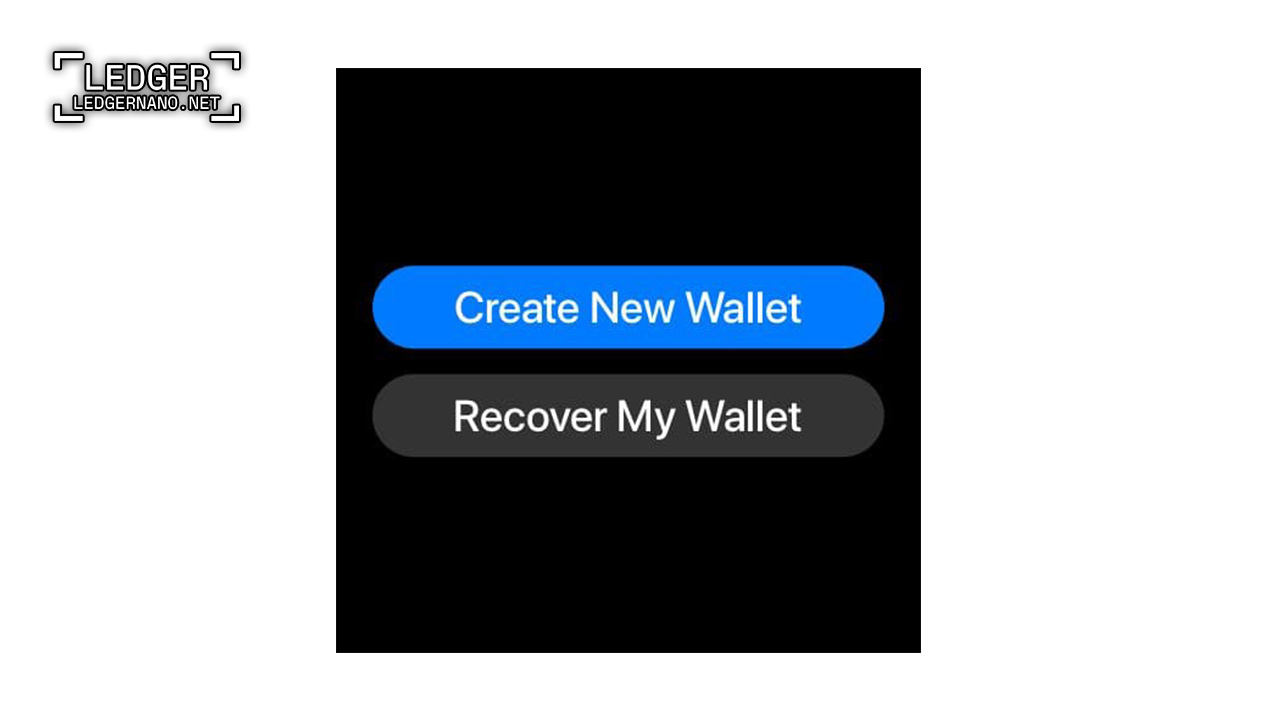
Once you have verified your S1 hardware wallet as genuine and safe to use, you can then initialize the device by either creating a new wallet or recovering an existing wallet on it.
- On the S1 device, you’ll see an option to choose between “Create a new wallet” or “Recover my wallet.
- Create new wallet” means that you are going to create a new and empty wallet for yourself. “Recover my wallet” means that you can import an existing wallet into the S1 device to get assets. Store and manage your existing cryptos in the new S1 hardware wallet.
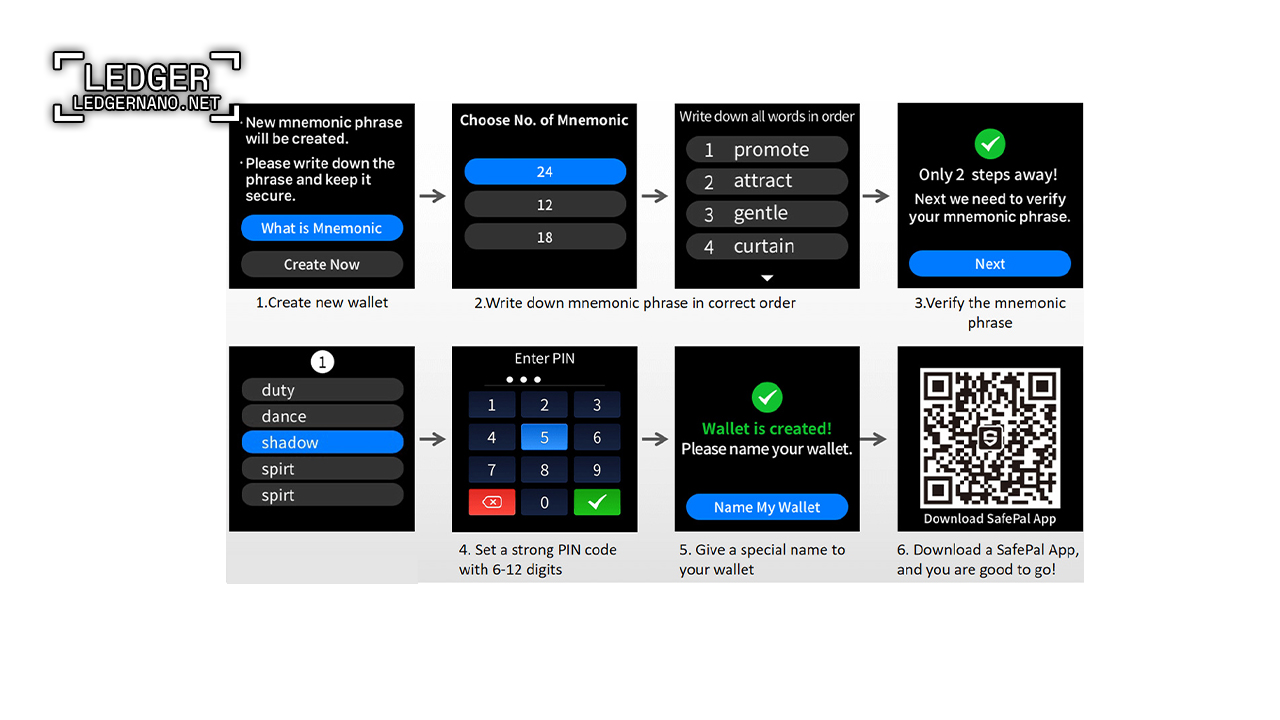
Creating a New Wallet on SafePal
The following images show the step-by-step process of creating a new wallet on the S1 hardware device:
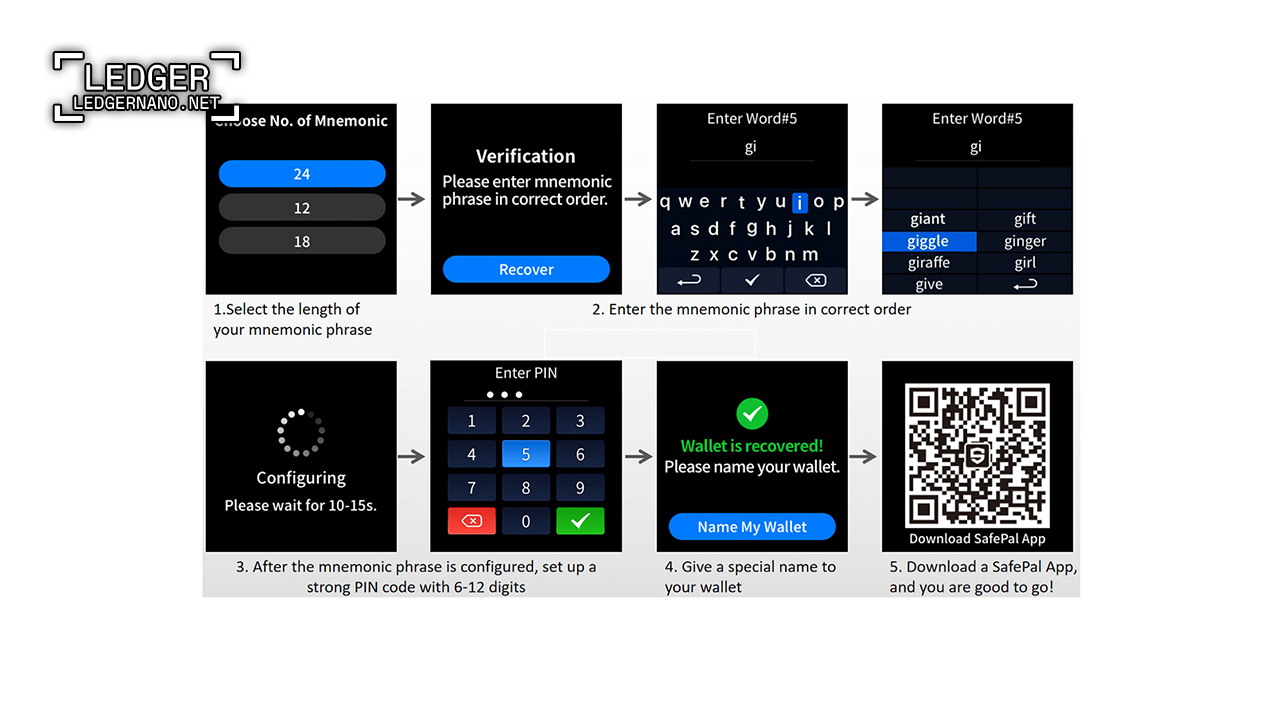
SafePal Wallet Recovery Guide
The following images show the step-by-step process of recovering an existing wallet on the S1 hardware device:
Pairing SafePal Hardware Wallet with the SafePal App
Since the S1 hardware wallet is an offline device, it is not able to connect to the internet or the blockchain to send or receive cryptocurrencies. In order to sign a cryptocurrency transaction or authorize a DApp login, an S1 hardware wallet must be paired with the SafePal app so that the SafePal app can broadcast the cryptocurrency transaction or fetch data from the blockchain or DApps. This way, your private key never leaves the offline S1 device and is securely protected.
Therefore, after initializing your S1 hardware wallet, the final step is to pair the S1 device with the SafePal app.
Downloading the SafePal App to Set Up Your SafePal Hardware Wallet
You can download the SafePal app by going to this link or scanning the QR code below:
Step 2 Configure SafePal Security Settings
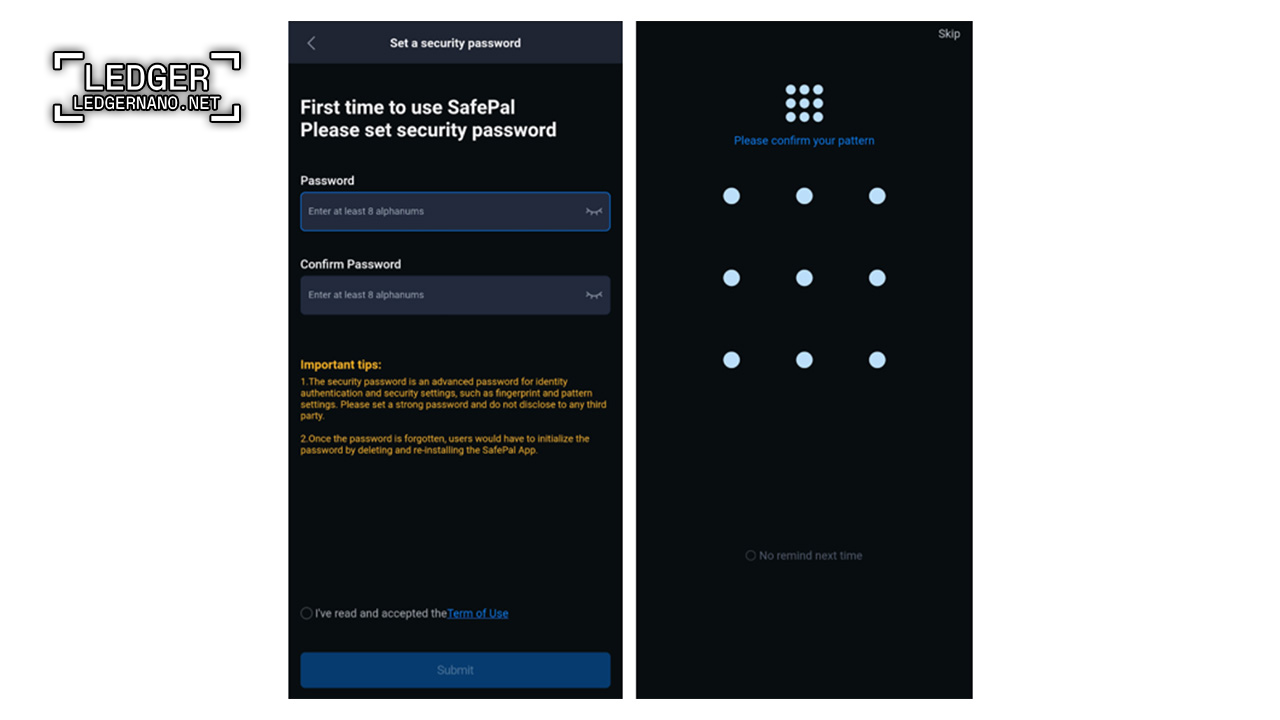
If this is your first time using the SafePal app, it will take a few minutes to set up the security settings in the SafePal app, including setting a secure password, fingerprint, and pattern. Follow the instructions on the app and it should be a relatively easy process.
Step 3 Pair Your SafePal Hardware Wallet with the App
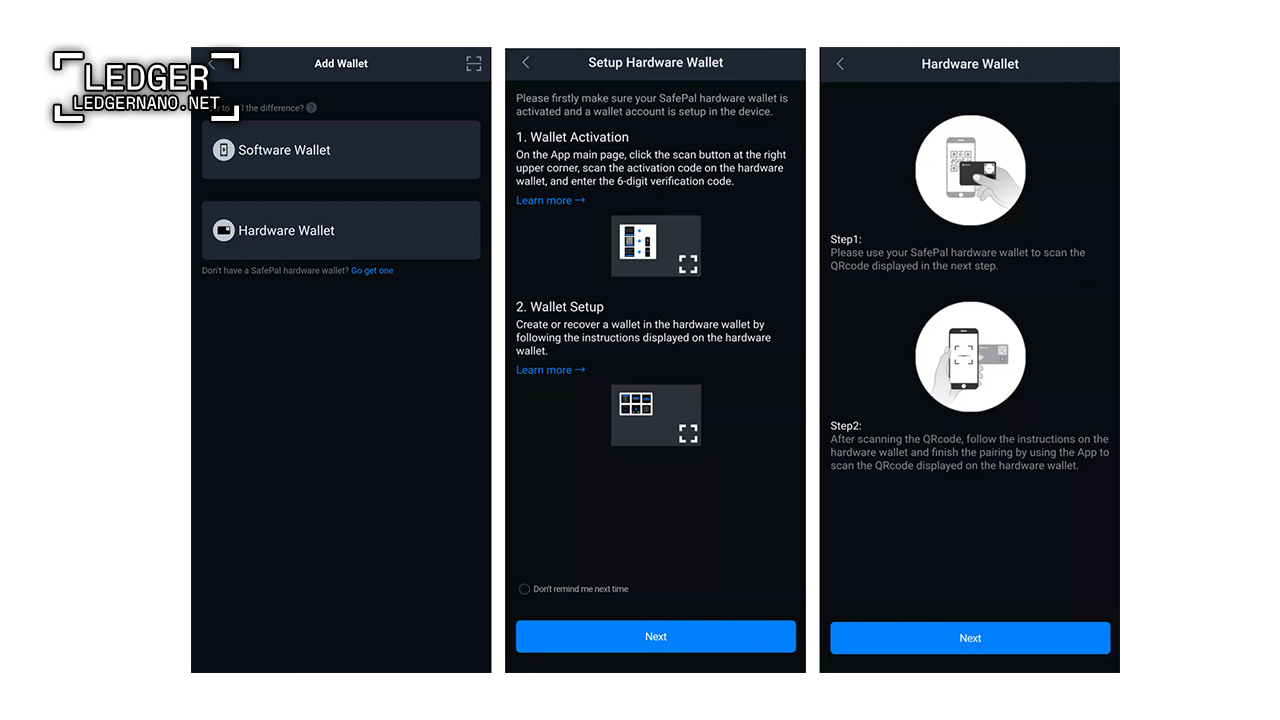
After launching the SafePal app, you can either add a software wallet or a hardware wallet. In this case, select “Hardware Wallet”.
Read the instructions on the SafePal app and click on “Next”.
Step 4 Scan the QR Code with Your SafePal Hardware Wallet
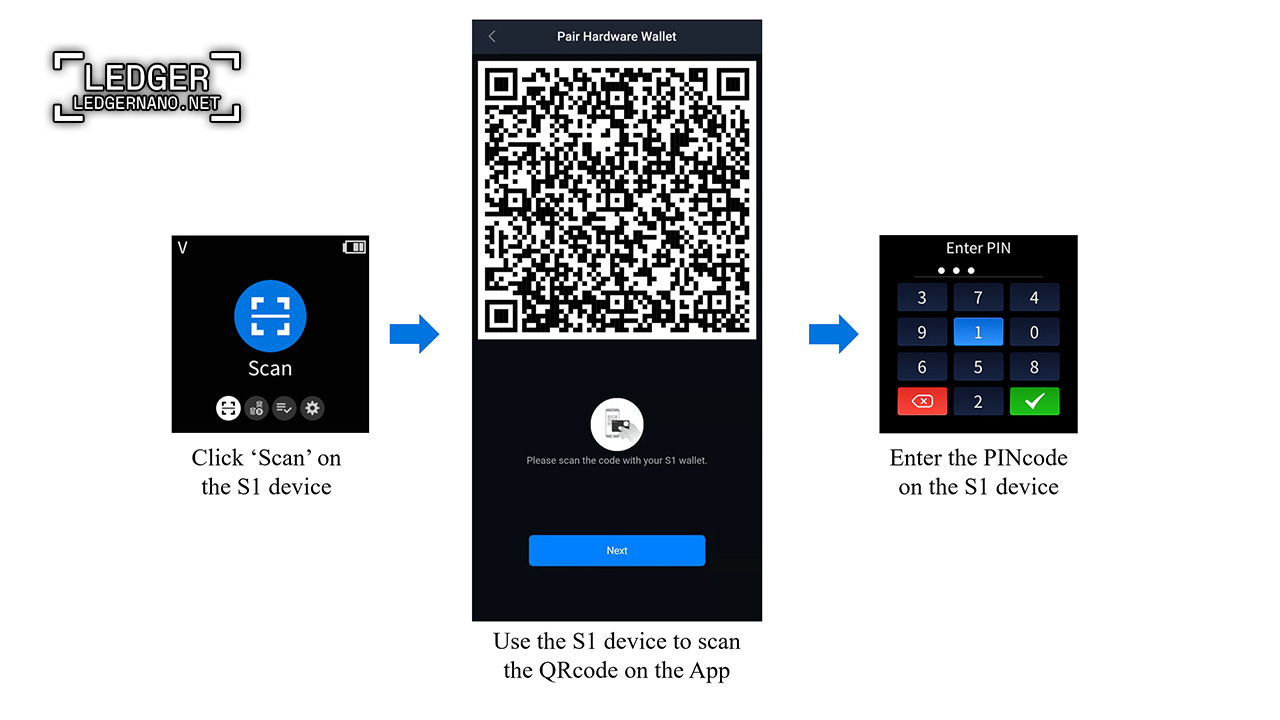
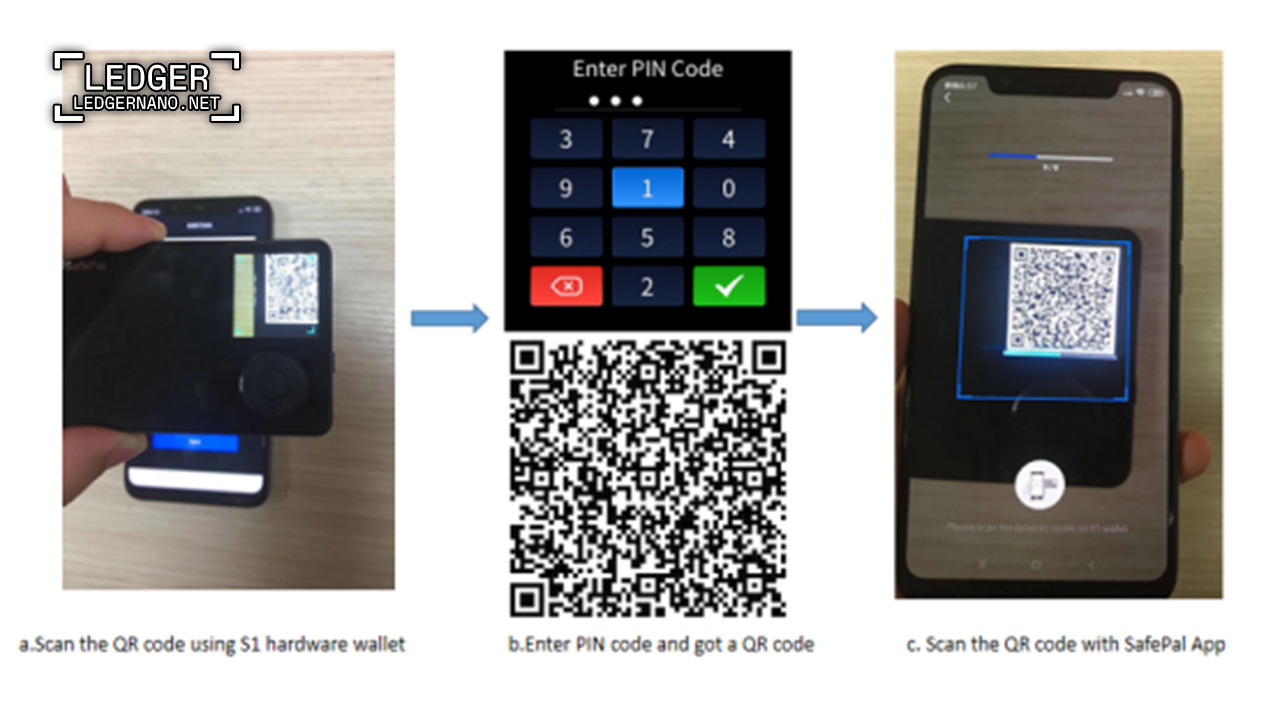
Upon entering the pairing process, you will see a QR code on the SafePal app. Open the S1 hardware wallet and click on “Scan” on the device. Then use the S1 device to scan the QR code shown on the SafePal app. By doing this, the app will be able to successfully connect with the S1 device. Then enter the PIN code on the S1 device to authorize the connection.
Step 5 Scan the QR Code with Your Mobile Phone
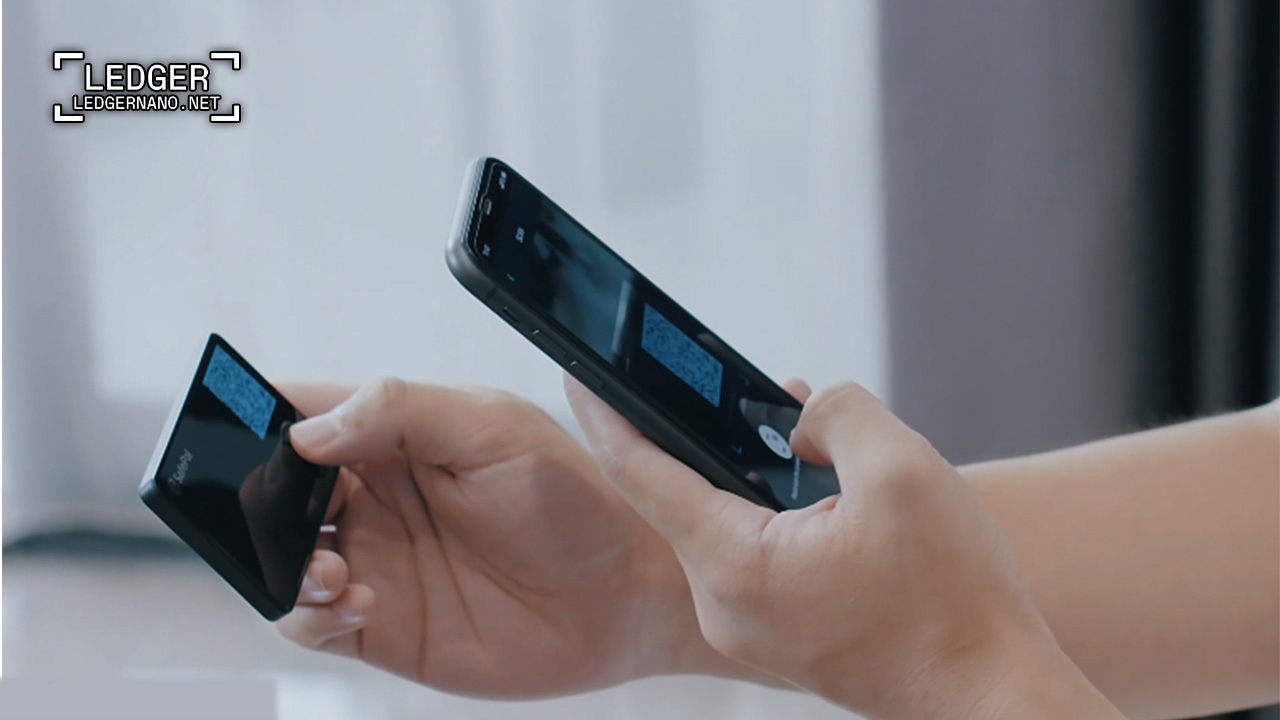
Upon entering the pairing process, you will see a QR code on the SafePal app. Open the SafePal app on your mobile phone and use the camera to scan the QR code shown on the S1 device. By doing this, the app will be able to successfully connect with the S1 device. Then enter the PIN code on the S1 device to authorize the connection.
Account Recovery in SafePal Wallet
If you have recovered an existing wallet on the S1 hardware device, you can already see the coins and tokens in the SafePal app by pairing the SafePal app and the S1 device together. In this case, there is no need to add the coins or tokens manually again because the app will automatically pull the balance of your crypto assets from the blockchain.
If you have created a new wallet on the S1 device and paired the S1 device with the app instead, you may want to manually add some coins or tokens to the wallet so you can start receiving cryptocurrencies using the wallet.
Tips:
-
You can see all the cryptocurrencies supported by the SafePal S1 hardware wallet here.
-
Each S1 hardware wallet comes with the default BTC, ETH, and BNB (BEP2) signing algorithms. This means that every new S1 hardware wallet can, by default, sign transactions for BTC, ETH, BNB tokens, ERC20 tokens issued on Ethereum, and BEP2 tokens issued on the Binance Chain. If you own any of these coins or tokens in your wallet, you no longer need to add them manually to the S1 device.
-
If you are adding a token (not a coin), you only need to add the native coin of the blockchain on which the token is issued to the S1 hardware wallet.
-
Example A: If you have added ETH to the S1 hardware wallet, it means that the S1 device has already activated the signing algorithm for all ERC20 tokens as well, and you do not need to manually add any ERC20 tokens issued on Ethereum to it. In other words, if you have ETH in your S1 hardware wallet, you can also send and receive any ERC20 tokens without having to do anything else
-
Example B: If you want to add USDT (TRC20) to your asset list, simply add the TRX coin to the S1 hardware wallet, then you can sign any TRC20 token transaction with the S1 hardware wallet.
The following is an example of adding a native coin to the S1 hardware wallet using TRX as an example:
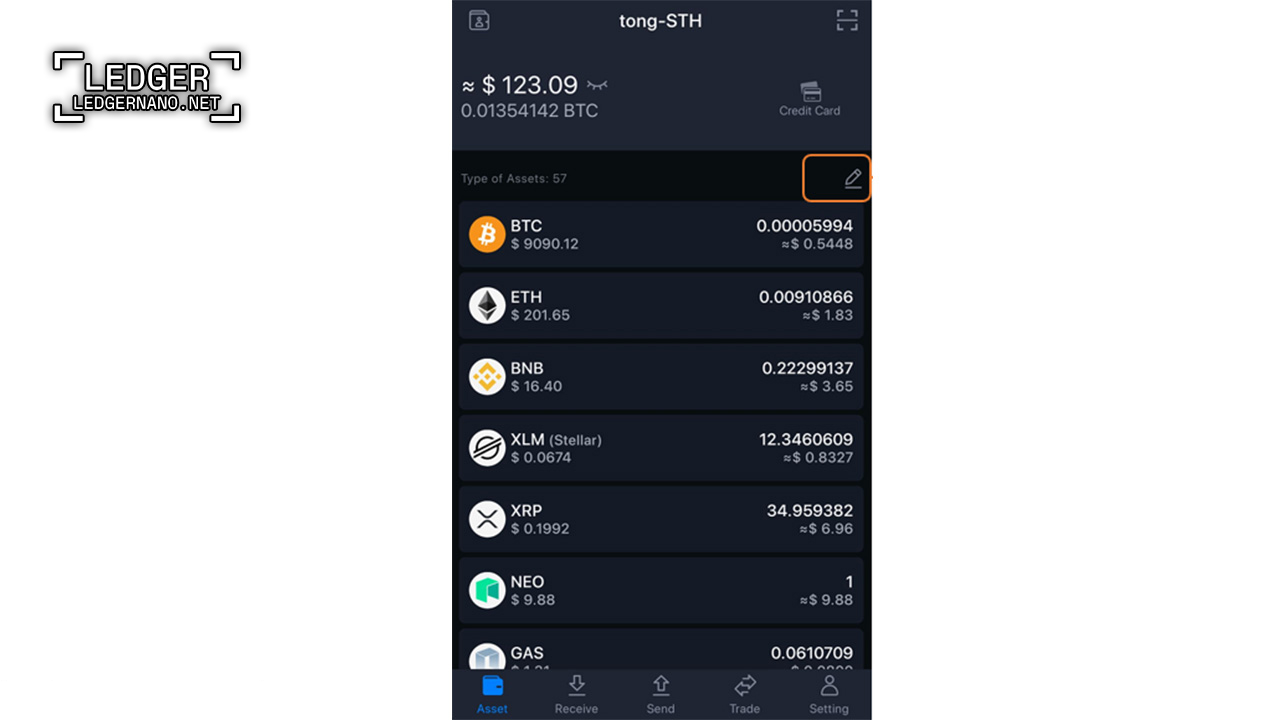
Step 1 Open the SafePal app and click on the edit button as shown in the image below.
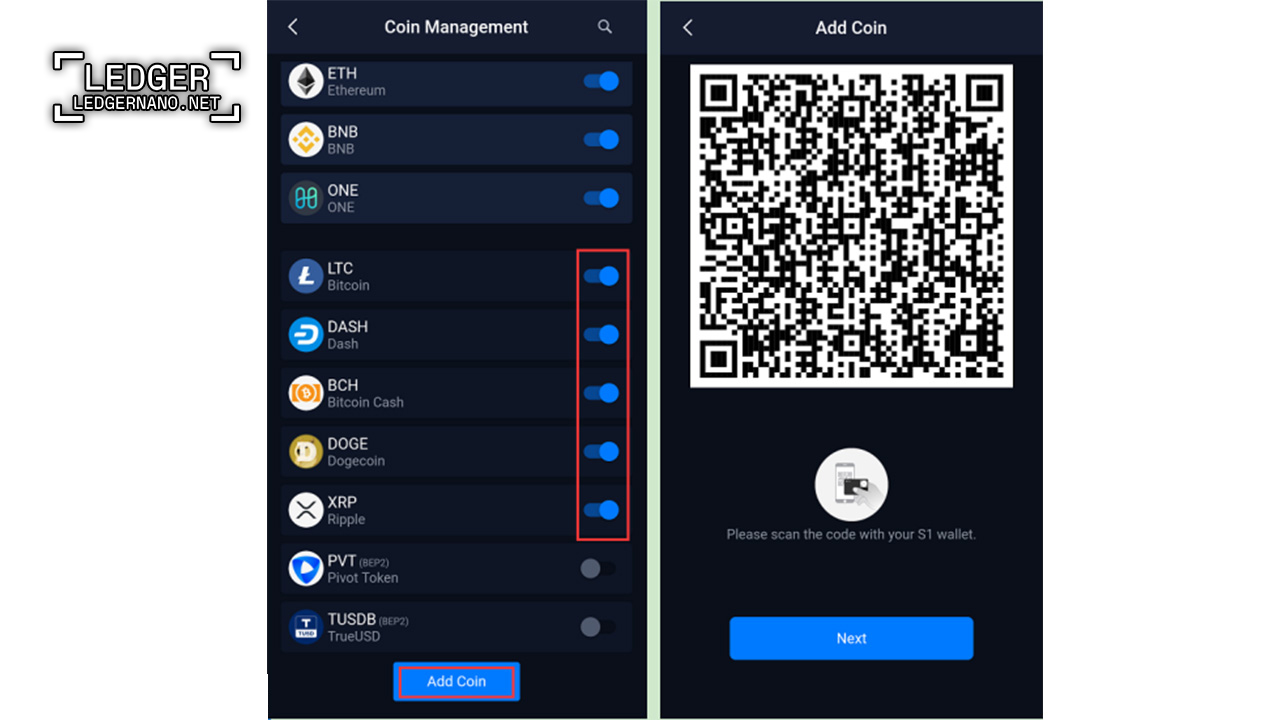
Step 2 Select all the coins you want to add and click “Add Coin” at the bottom.
Step 3 Scan back and forth between the app and the S1 hardware wallet (just like how you paired the device and app in the last step) until the data is properly synced between the app and the device.
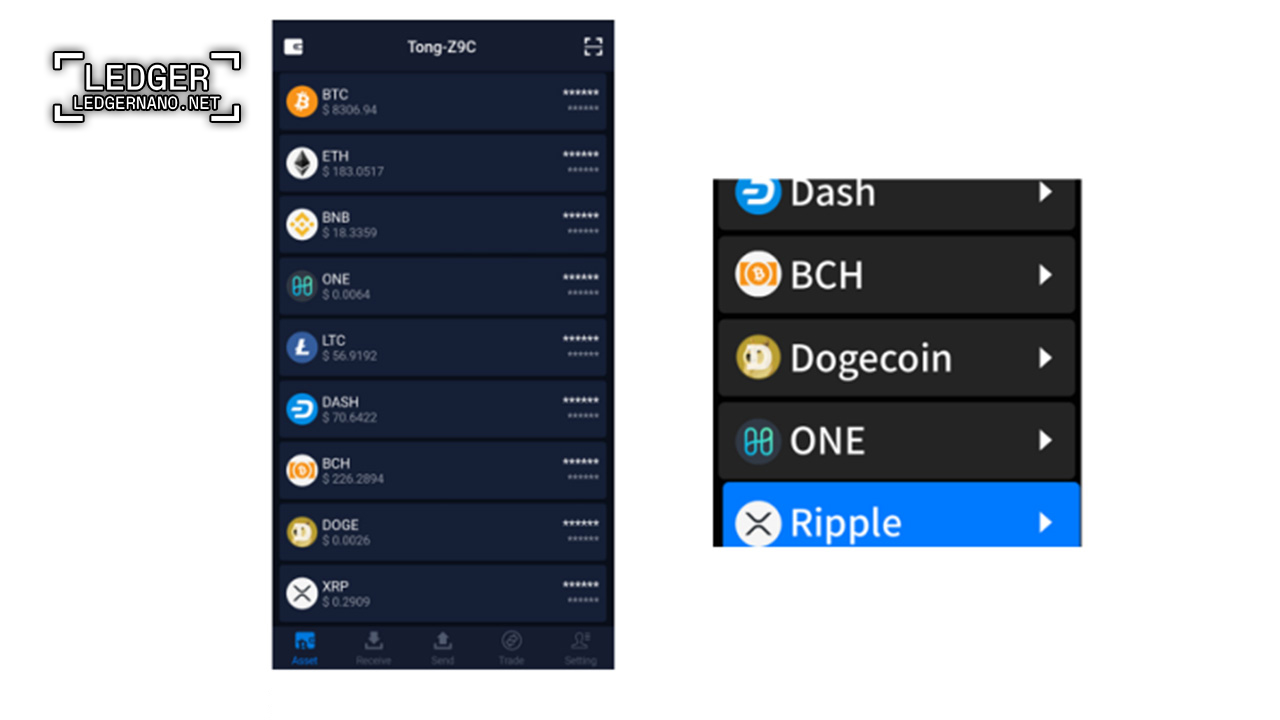
Step 4: Then the coins are successfully added and you can see them in the “Asset Management” tab on the S1 device.
In the video below, we have shown step-by-step how to set up Safe Bridge.
